| An Adventure in "Line
Designs"
[String
Art Project] [String Art Project Evaluation] [String Art Teacher Notes]
 Who
says you can’t create curves with line segments? It is fascinating to
discover a curve formed from a series of straight line segments. Line
designs utilize basic geometric forms, making curves out of segments.
Order and symmetry are the basis of string art's appeal. Elaborate designs
can be created with geometric shapes, points, and colored string. Who
says you can’t create curves with line segments? It is fascinating to
discover a curve formed from a series of straight line segments. Line
designs utilize basic geometric forms, making curves out of segments.
Order and symmetry are the basis of string art's appeal. Elaborate designs
can be created with geometric shapes, points, and colored string.
Line designs form a basis for mathematical understanding
of geometric shapes and relationships of points, segments, and angles.
Each of the line segments is really a tangent for each of the curves being
formed. But because of what we focus on, we often see the curves. For
example, some of the curves that can be created are circles, parabolas,
ellipses, hyperbolas, spirals, and some lesser known curves called cardioids,
limacons, and deltoids. Yet in each case they were created with angles
of different sizes, regular and irregular polygons, and a lot of segments
and points.
Attractive and sophisticated line designs can be produced
and created using only a ruler, compass, protractor, pencil, and paper.
Computers can be used to imitate this procedure; Geometer's Sketchpad
is software that can be used. Symmetry - line symmetry,
rotational symmetry, and point symmetry bring interest and charm to your
string art.
Start with this!
 And it could look like this! And it could look like this!
You can use nails and wood, foam core or cork with
strong pins, or a stiff piece of cardboard or thin wood with holes in
it to provide your working surface. You can paint or cover the working
surface. String, embroidery thread or thin yarn can be used to
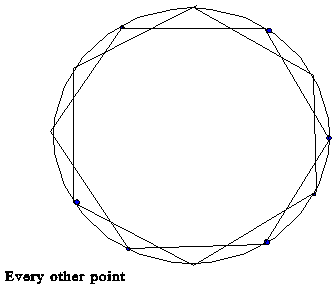
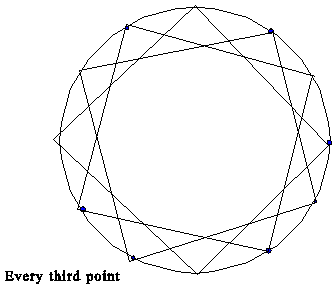
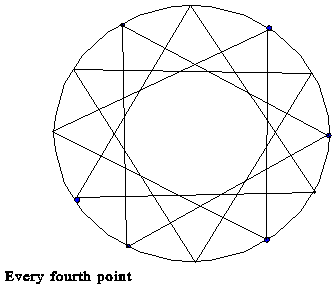
stitch your piece of mathematical art. The original placement of the nails/holes
help to determine the shape of the final project. For instance, if you
construct the diagonals of a regular 24-gon (an icosikaitetragon) you
will be able to see many concentric circles. By adding different layers,
different colors, and/or varying the way you connect the nails/holes,
the design gets more interesting. Sometimes the empty spaces in the design
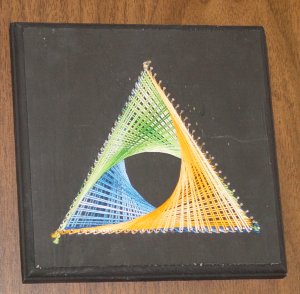
are as important as the placement of the string. Notice how a curve was
formed by connecting points along the sides of an angle in the illustration
below. Use your compass, a straightedge, and colored pencils to create
an original and interesting pattern to stitch.
Major Parts of this Project
This
is a major grade and should be taken seriously. Late work will
not be considered. This project is due on or before ____________________.
 |
Three
things are to be turned in:
1) your original design on paper. You are to incorporate at least three geometric
concepts (i.e. acute, right, and/or obtuse angles; triangles, circles,
quadrilaterals, pentagons, hexagons, and/or other polygons) into
your design and label them on the plan you turn in. Color-code the
design that you will turn in with colored pencils - make two copies.
Use one to hand in and one (a photo-copied one) to
aid in nail/pin/hole placement.
2) your completed
string art project. The final project can be no larger than
15" x 15" if it is mounted on a flat surface or it should
fit into a 15" x 15" x 15" cube if it is 3-dimensional.
Remember to put a hanger on the back of flat string art (The tab
on a pop can nailed to the back works well and can usually be obtained
without an additional cost.) or a string hanger for 3-dimensional
projects. Put your name, grade in high school, and date on the back
of your project.
3) a paper giving
your completed piece of geometric art a TITLE/NAME and addressing
the shapes and symmetry that can be found in your original design. (See the Evaluation tool!)
|
Before you begin it will be helpful to find out about the strengths and weaknesses
of various materials and how to avoid potential hazards.
FLAT DESIGNS: Wood works nicely with
nails since they can be nailed in tightly and will be strong enough to
make sure that string can be pulled tightly. Paint or cover your work
area to bring out the beauty of your design. Place a copy of your design
on the work surface and secure it with tape while you attach the nails
or pins or punch the holes for your design. Remove the copy carefully
from the work area after you've secured the nails or (if you think you
can) after the string has been added to the design. Decorative nails are
available but remember that they become part of the design. Nail heads
can be painted to become part of the design. If you use cardboard with
holes, use stiff cardboard that will not bend or bow when the string is
woven. A second layer of cardboard on the underside trimmed about 1/4
inch smaller all of the way around the shape will make it stronger. If
colored cardboard is not available, paste colored paper on a cereal box
(paper board) cardboard and mount this on corrugated cardboard or foam
core board. Make all of your markings on the underside of the cardboard
when sewing with your "string."
 STRING: String that is too thin breaks easily; string that is too
thick is hard to work with and takes away from the intricate designs that
you've created. String or thread that contains polyester tends to stretch
over time so it is NOT a good choice. Embroidery thread and thin string
make good choices because of the availability of vivid colors and ease
of use. Using lengths longer than 4 feet are often hard to work with because
they tend to get tangled. Secure your threads securely with tight knots
(a very small amount of clear-drying glue on the knot will help to secure
it but make sure that it dries completely) or pull the string through
to the back of the design and secure it with strong tape. For each project,
begin the weaving slowly until you become familiar with the pattern that
you’ve created.
STRING: String that is too thin breaks easily; string that is too
thick is hard to work with and takes away from the intricate designs that
you've created. String or thread that contains polyester tends to stretch
over time so it is NOT a good choice. Embroidery thread and thin string
make good choices because of the availability of vivid colors and ease
of use. Using lengths longer than 4 feet are often hard to work with because
they tend to get tangled. Secure your threads securely with tight knots
(a very small amount of clear-drying glue on the knot will help to secure
it but make sure that it dries completely) or pull the string through
to the back of the design and secure it with strong tape. For each project,
begin the weaving slowly until you become familiar with the pattern that
you’ve created.
If you are making a 3-D design with straws, use thin
cotton tatting, crochet thread, or one strand of embroidery floss. For
wood dowels, cardboard, or nails, these same types of thread or somewhat
heavier cotton crochet thread works well. Caution: Polyester materials
may sag later because it gradually stretches over time. Pull the strings
tightly while building polyhedra with the straws and while weaving. Sagging
straws and limp strings detract from the beauty of your geometric work
of art. Winding the string on a spool or cardboard tube will make working
with wood and nails a little more manageable. For weaving on plastic straws,
use NO MORE THAN 4 feet of string on the needle at a time. You’ll get
all tangled up if you do!
 COLORS: Your string colors should coordinate
with your background color or the colors on your straws. Contrasting colors
make interesting and attractive designs. When using two or more colors
of string choose all bright colors or all pastels – colors with the same
tone value. If you will be hanging your design from the ceiling, make
your string a different color than the walls that will be in the same
room.
COLORS: Your string colors should coordinate
with your background color or the colors on your straws. Contrasting colors
make interesting and attractive designs. When using two or more colors
of string choose all bright colors or all pastels – colors with the same
tone value. If you will be hanging your design from the ceiling, make
your string a different color than the walls that will be in the same
room.
GLUE: Should you need to use glue, white clear-drying
glue works best on wood dowels. If you are trying to get plastic straws
held in place, rubber cement works best.
STRAWS: Use a heavy needle and thin thread
for dropping the threaded needle through the straws; the needle may get
stuck inside the straw if it is not heavy enough. Plastic drinking straws
or stiff round stirring straws make neater models. Slender straws make
neater designs, however slimmer and longer straws tend to bend. When you
make the holes in the straws, punching them closer together makes them
more intricate. However, if you punch them further apart it helps to prevent
them from arching. If straws begin to bend, insert pieces of coat hangers
or thin dowels through the straws. Applying rubber cement will help to
hold them in place.
WOOD DOWELS: The sturdiest 3-D models are made
with wood dowels. Making notches takes more time, but the wood rarely
arches during the weaving. The most attractive models have slender edges
and notches close together. Wood dowels make it easier to make larger
models that won’t tend to bend or arch.
[String
Art Project] [String Art Project Evaluation] [String Art Teacher Notes]
|


