Using Screen Shots in the Curriculum
This is a computer lesson designed to be taught
to teachers. The purpose of this lesson is to give teachers technology
skills and tools which they can use to reinforce and enhance their lessons.
Did you ever want to show someone on paper the steps that you used to create
a document using a computer program? The easiest way is to take a computerized
snapshot (aka screen
shot) of a selected part of the image on the monitor depicting various
stages, steps, or items revealed in the process. Such snapshots
can be produced by using different utility programs or certain key commands
on the Macintosh.
Screen shots can be used to create worksheets,
homework, tests or other instructional materials. When an image on
the monitor is composed of multiple objects, many children have a hard
time focusing on just a single item. They can be over-stimulated
by the visual complexity of the screen. By creating screen shots
of specific objects, the teacher can isolate specific items upon which
the child should focus. This helps the student to target his
or her attention on one thing out of many.
How to Use Screen Shots: An Anecdote
from My Classroom
I found a wonderful program that is offered
free of charge on the Internet. It is called Casper's Treasure Hunt. Basically, this program opens to a haunted room in a house with lots of
scary music and scary things. A flashlight appears on the screen.
When you click on the flashlight, a written riddle appears. The answer
to the riddle tells you what object you are to locate. Use
the flashlight to look around the room. As the light shines on various
objects, you realize that the object is not what it originally appeared
to be.
Because I work with autistic children, I noticed
that it was very difficult for some of them to follow just verbal statements
telling them upon what objects to focus and locate on the screen.
By taking a screen shot of each of these target objects, I was able
to print out individual pictures of the objects that answered each of the
riddles. On the back of each picture, I placed a small Velcro patch.
Once I read the riddle aloud to the student, I would place the picture
on a Velcro strip that I had attached alongside the computer screen.
Then I would ask the child to find that particular object.
Because this process requires the student to follow instructions, make
a choice, and click on a visual representation of an object, this simple
process reinforces not only literacy skills but also reasoning abilities,
and eye-hand motor coordination.
The example provided in this lesson is deliberately
not complete because I want you to adapt it and complete it to meet your
own instructional needs. Custom design the selection of objects
for screen shots to address the needs of your own students.
Lesson One
A.
It is important to share and brainstorm with
the colleagues how one might utilize this tool in a classroom.
The use of screen shots has many applications for instructional integration
into lesson, into supplementary materials, or into evaluation methods.
It can be useful in reinforcing or testing concepts.
For example, I could have made a test sheet
to measure the success of the Casper's Treasure Hunt by having the
pictures placed vertically on one side of a piece of paper and the corresponding
word for the object randomly placed within a list on the other side
of the paper. The students would then be asked to draw a line
from the object to the word that correctly describes it.
An alternative evaluative activity would be
to ask students to circle two similar objects out of a series of three
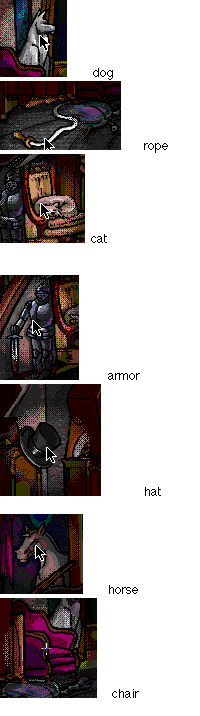
screen shots. For example, a student might view the following
three screen shots: a hat, a dog, and another type of hat. They would
then circle the two hats indicating that they are the similar objects.
B. The Utility Screen Shot Tool
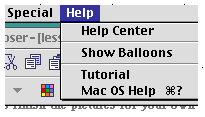 |
The basic key command for the Macinosh is
OPTION, SHIFT and 3. This works on all Macs....On Macs using 8.6 there
are more key commands which allow you to select certain areas only. You
can find this information in the help section. In order to get to the help
section you go up to the menu bar while in the finder and go to help: |
Next you need to find the snap shot you just
took. By default it is saved on the hard drive as picture X. |
 |
C. Inserting The Image Into A Document
 Claris
Works or the most recent AppleWorks is a program which is shipped with
the Mac. It is capable of word processing, database, spreadsheets and communication.
For our purpose here I would either stick to word processing or the drawing
program. You can save it exactly as it is which is a Pict file or else
change it so it can be used elsewhere such as the web. To change it you
would place it in the drawing program then when you save as select gif. Claris
Works or the most recent AppleWorks is a program which is shipped with
the Mac. It is capable of word processing, database, spreadsheets and communication.
For our purpose here I would either stick to word processing or the drawing
program. You can save it exactly as it is which is a Pict file or else
change it so it can be used elsewhere such as the web. To change it you
would place it in the drawing program then when you save as select gif.
RESOURCES:
Snagit for
windows
Snapz Pro 2 shareware for Mac
The
Casper Treasure Hunt for the MAC
The
Casper Treasure Hunt for the PC
The following images were from the Casper Adventure
program:
|