Overview
Timeline
Lesson 1: The Sensory Palette
Lesson 2: The Literary Palette
Lesson 3: The Color Palette
Lesson 4: The Studio Palette
Enhancements & Follow-Up
Resource List Illustrative Materials
& Showcase Gallery
Assessments & Evaluation
Strategies Gallery Guestbook
Teacher Diane Lufrano's Adaptation of this Unit
Link to Other
Lessons by Lori (middle school level)
|
Lesson #4: The Studio Palette Artful Installations: 3D Environments |
 |
Instructional Objectives:
Students will:
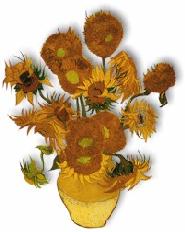
1. interpret and appreciate the unique painting styles of each of their artists studied and solve design problems as they explore perspective, scale, and point of view.
2. work cooperatively and creatively to design a 3D Artful Installation: Sculptural Construction
3. value the fruits of their labors by participating in our annual Spring “Studio Gallery 315” SHOWCASE ART GALLERY of their artwork.
Time Required: Days 7 – 22 from timeline. 3 weeks, 40-minute periods
Advanced Preparation & Materials: Prepare reading comprehension worksheets on the art of Red Grooms’ “Ruckus Manhattan”, found objects, collage materials, scrap materials, fabrics, cardboard, paint, brushes.
Vocabulary: sculptural, construction, assemblage, installation
Procedure: Working in cooperative groups, students will use problem solving skills, communication and diversity of tasks as they are challenged to create 3D Artful Installations.
Students will read and discuss: “RUCKUS: 3-D Collage Assemblage”.
Students will compare and contrast the work of Grooms with the artists of their choice, noting how Grooms’ works may be considered a whimsical “parody” collage type sculptural “happening”.
Using sketchpad designs, students will refine their ideas and draw, trace and cut out shapes from cardboard and foam board.
As the teacher walks around the classroom, she reviews students’ sketches to see if they have captured the essence of their chosen painting to assemble 3D pieces and arrange in a pleasing 3D composition using the elements and principles of design.
Based upon teacher review and recommendation, students continually work in groups until final projects are displayed on classroom desk space as a sculptural installation assemblage.
Class share out and oral presentations on their artist and his painting.
Final evaluations and presentation at “Studio Gallery 315”.
Evaluation of Process: observed degree of cooperation and decision-making both individually and collectively.
Evaluation Strategy: The installations are now displayed on the classroom desks for purposes of both teacher and peer evaluation and discussion.
Teacher-developed questions are written on board for students to copy and answer for the first half of one class period:
1. How are these constructions similar/different to those of the artists we have studied?
2. How is sculpture and 3D design reflected?
3. Which installations create depth and an illusion of space?
4. How could we have done things differently?
5. What did you find to be the most challenging aspect of this lesson?
6. Which Artful Installations do you feel are the most successful? Why?
7. Did you enjoy this lesson? Why? Why not?
 HOME
HOME