Start
the Year Off Right
Carl Sannito
I received
the following e-mail from a fellow teacher
a couple weeks ago:
Hi Carl,
I am a new computer teacher in Queens K-5 and I was wondering
if you had any creative idea for making a bulletin board and class
rules to start off the year.
I thought many teachers would benefit from my response, so I decided
to expand my reply and share some of the things I’m working
on as I kick off another school year. Some of these ideas can be
used in a classroom as well as a computer lab.
Label Maker
This idea can be used by all teachers. All you need is a computer
with a word processor and a printer.
I noticed that many of our primary teachers had taped sentence
strips around their classrooms to label objects (“clock,”
“door,” “library,” “listening center,”
etc). I thought I could do something similar, but I put my own twist
on the idea. First, because I see both English and Spanish speaking
students in the computer lab, I wanted my labels in dual languages.
That’s where translation web sites come in handy. My favorite
is Google Translation.
All I had to do was type in the English phrase and I had a variety
of languages choices, including French, German, Spanish, Italian,
Japanese, Korean, Chinese and Portuguese. (You can also translate
from those languages to English.) The translations aren’t
always perfect, so you should get someone who knows the language
to double check your work, but they work well in a pinch.
Of course, I didn’t want to print all these labels out by
hand, so I just fired up my word processor and typed up the list
of labels. This way, not only do they look professional, I have
them saved for next year. I made the font size rather large (at
least 75 point size), used a variety of colors (this will only work
if you have a color printer). I often find it is better to print
out using the landscape page orientation.
If you have some extra time, you might want to print out your labels
with a fun font. A couple of fun free sites that I like to use are:
http://blambot.com and
http://momscorner4kids.com/fonts/index.htm,
but a Google search for “free fonts” will yield more
results than you’ll have time to visit. Keep in mind that
you can waste a lot of time playing with fonts! Also remember that
you are looking for a “clean” font – something
that can be read by children at a distance. Keep it simple is a
good rule of thumb.
As I began working on the project, the reading specialist (Hi,
Marcey!) at my school had a great suggestion. She thought that instead
of just creating simple labels I should create complete sentences
to help immerse our students in a print rich environment. So instead
of creating a list of words like “clock” or “door,”
you could say “The clock helps us tell time. Can you tell
what time it is?” or “We use the door to enter and exit
the classroom.” I highlight the noun to indicate the label
name.
Technology is Everywhere
This idea is a little more high tech, but not too hard. You need
access to a digital camera and a color printer.
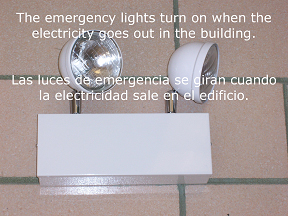
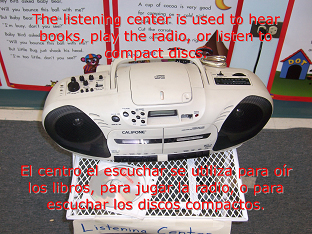
I created a display titled, “Technology is Everywhere”
to show that technology isn’t just the computer in the computer
lab. I went around the school building with my digital camera and
took pictures of different ways that technology is used in the building.
I have pictures of things like computers, printers, calculators,
over-head projectors, listening centers, head phones, etc. I printed
out the pictures in a large size (like 8 by 10) so they can be displayed
nicely. Then I labeled each picture with descriptive sentences in
both English and Spanish. You can print out the labels separately
or use some photo editing software to put the label on the picture.
Here are a few examples:

Word Walls with a Twist
My final suggestion was something that classroom teachers of all
grades use constantly: The Word Wall.
The Word Wall is simply a space in the classroom where teachers
post important words. Ideally, this makes the words visible so students
can remember them, practice them, and use them. Hopefully the Word
Wall is a living space: it should get updated regularly and the
students should know where it is and what it’s used for. If
you ask your students where the Word Wall is, they should know.
More importantly, if you ask them how they use it, they should have
lots of answers.
My little twist isn’t anything special, but since I deal
with primary students, I try to place pictures next to each word
on my wall. I usually just use clip art built into my word-processing
program. But if you have a digital camera, you can create your own.
Microsoft has some great clip are in Word, but it’s usually
on a stand alone CD.
A quick Google search for “Word Walls” (are you seeing
the pattern here? Google is a teacher’s best friend!) will
help you make your Word Wall interactive and exciting. Here are
a couple of links to get the ball rolling:
Building
Your ESL Student's Vocabulary
Interactive
Word Wall
Conclusion & To Be Continued
I hope you can take an idea or two from this article and run with
it. If nothing else, always remember that Internet searches are
a great way to find ideas and inspire new ones.
Finally, I didn’t forget that the teacher who wrote to me
asked me for ideas regarding rules in a computer lab; I’m
going to address that topic in a separate article because there’s
a lot to say about classroom management, rules, and disciple in
a lab setting.
If you have a comment about this article or want to share your
experiences, you can e-mail Carl at carlsannito@yahoo.com. |


