Structure WebQuest
[Introduction]
[Task]
[Process]
[Resources]
[Evaluation]
[Conclusion]
[Teacher Notes] [PowerPoint Presentation Download] [PowerPoint Presentation on the Web]
Introduction
You are a
part of a group of structural engineers and you've been given a challenge. You
are to design and build a tall and strong structure from a given set of
materials at an engineering competition. With this structure, your team must
submit a report that proves to the panel of judges that you really know your
business and that your structure wasn't the winner by luck but instead by great
design. The prize will be a huge construction contract for your firm.
The Task
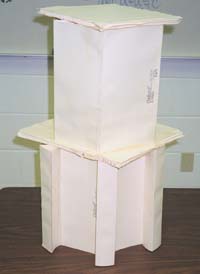
You have one week to
research, design, build, and test your structure. Your structure should be
taller than 9 inches and hold at least a 25 pound weight (like one found in the
weight room). Your structure will be made from 25 manila file folders and white glue
(materials will be supplied by the company hosting the competition.) Your group
consists of 4 members.
-
Design Engineer - This person will look at designs in nature, shapes in
geometry, and designs of packing materials and how this affects the strength
of a structure.
-
Strength Engineer - This person will look at buildings and building
codes to find out what makes them strong enough to hold up to natural forces such as
earthquakes, wind, temperature changes, etc.
-
Height Engineer - This person will look at skyscrapers and how they are
built to see what keeps
these giant buildings from falling over.
-
Journalist - This person will conduct interviews with community
members such as architects, other engineers, city planners, and people in the
construction field to gather the most pertinent information.
The Process
The purpose of a
building’s structure is to guarantee that the building will stand up under all
the loads and forces acting on it: the weights, the pressures, the wind, the
forces due to temperature changes, and perhaps even the shaking caused by
earthquakes. Engineers want to build structures that won’t collapse and will
resist damage. It is also important to make sure that a building will not move around.
You don't have any time to waste. So get started with this plan for your
week.
Days 1 and 2: Research
-
As a group, investigate equilibrium,
rigidity, tension, & compression. (Do this together in class!)
When a building does not move, we say that it is in equilibrium
(equilibrium is a Latin word meaning balance ). Laws of equilibrium
were established by Isaac Newton. Simply put, these laws state that for
each force applied to a building an equal force should oppose it.
Rigidity is a term often associated with triangles. Why? Are there
three-dimensional shapes that should also be in a discussion of strength and
rigidity? All structures are always in either tension
or compression. Structures can only pull or push. What does it
mean that a structure is in tension
or compression?
-
Get started on finding answers to your questions as given on the worksheets
linked below. (These should be worked on in class AND as HOMEWORK!)
Your research, homework, and interviews should help you gain some valuable
knowledge about structures and strength.
Days 3, 4, 5, and 6: CONSTRUCTION and REPORT
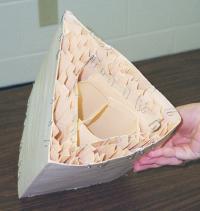
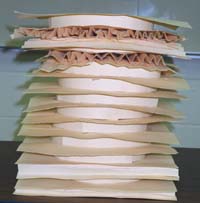
1. Building your structures:
Once your group is equipped with more knowledge of structures and strength,
you will be ready to create a structure. Using only white glue, 25 file
folders and what you've learned about rigidity and strength from your
experience, your experiments, and your research, you and
your group are to create a structure that will hold the most weight, be very tall, or
a combination of both. Can you cut the folders? YES...you can cut
them and use white glue to glue them together. You can use paper clips to hold
the folders together while they dry but they must be removed from the
structure before testing.

You will be working in groups of 4 students. You will be given one
file folder to explore first and then your group will be given 25 new
ones for the project. This will ensure that all of the file folders are
the same weight and size. Your group must plan well to make sure that you
will be able to complete your structure in four class periods. All structures
must be completed in class. You may not take your structure home to work on it.
Be creative with your design. You will want to discuss this project with other
people - students, parents, friends, others - via conversations or e-mail.
2. Communicating and Evaluating your knowledge:
 Your group can choose to either write a report or create a web page report to submit with your structure. The reports will be submitted both on disk and as a hard copy. The JOURNALIST is to coordinate
this effort, not do it all. This report is to include:
Your group can choose to either write a report or create a web page report to submit with your structure. The reports will be submitted both on disk and as a hard copy. The JOURNALIST is to coordinate
this effort, not do it all. This report is to include:
-
information about tension, compression, and rigidity. Make sure to explain if your structure will be under tension or compression or both and why. Talk about the rigidity of the geometrical shapes that you used in your design.
-
the stress of natural disasters on structures and the structure's strength.
-
at least one additional (important) piece of information from each set of research questions that you found
while answering them.
-
at least four helpful and interesting things that you learned from your interviews.
-
reflections on things you've learned while building your structure. What things seemed to work? What didn't work? If you could have made changes, what would they be?
At the end of the report, list the people interviewed by the team. Also include a complete bibliography of
resources used - both print materials and web pages.
Assign one member of the group to be the photographer. You will have the opportunity to use the digital camera to take pictures of your structure as you construct it. Photographs are to be used to document your design and building process as well as your final structure. A disk should be available during class to work on your report and to
save photos. Some of these should be used either in your report or on your web page.
Unlike your structures, these reports/web pages probably will be completed outside of class. You and your groups can get together after
school or communicate by phone or e-mail. At the end of the printed copies of the report attach the answers to all of your research questions and all of the completed interview worksheets.
Days 7 and 8 (if needed): Evaluation

Testing the structures:
-
First, teams should submit each member's evaluation sheet, complete with his/her
name and individual guesses for the amount of weight that the structures
will hold.
-
The official measurer will measure the height of the structure in inches and record it on the evaluation sheet. Finally, you'll test your
structure for strength. You must begin by placing a 25 lb. weight on your
structure. Once a weight (2.5 lb - 45 lb. weights) has been placed on
your structure, it cannot be removed and replaced with another....you
should discuss some strategy. When any weight falls off of the structure or
the height of the structure goes below 6 inches, the testing is complete. The
weight is recorded at the last weight that was successfully placed and held by
the structure for 5 seconds. The most weight held by one of these structures
so far has been 1557 lbs. and it was 10 inches tall! The tallest structure
was 26.5 inches and it held 225 pounds. If your structure is 10 inches tall
and holds a minimum of 25 pounds, your group will be guaranteed a minimum of 10
points out of 20 for height and 10 points out of 20 for weight.
 Communicating your Learning... Communicating your Learning...
Finally, write a report or design a web page addressing the facts
above. Include a complete list of Internet sites, bibliography of books and people interviewed during this project. Attached to the report (on disk and on paper) or
web page (on disk with printout) should be the answers to the research questions, each of the completed interview sheets, and your answers to the reflective follow-up questions. It is recommended that all parts of the report be completed (except for the reflective
follow-up questions) before the structures have been tested. The due date for the report will be given in class.
Resources
Internet Resources
Resources in Print
-
The Art of Construction: Projects and Principles for Beginning Engineers and Architects by Mario Salvadori. Chicago Review Press, 1990. ISBN 1-55652-080-8
-
Structures: The Way Things are Built, by Nigel Hawkes, Macmillan, USA, 1993
ISBN # 0-02-000510-5
-
Amazing Buildings by Philip Wilkinson, Doriling Kindersley, NewYork, 1993
ISBN # 1-56458-234-5
-
Why Design? Activities and Projects from the National Building Museum by Anna Slafer
and Kevin Cahill, Chicago Review Press, 1995 ISBN # 1-55652-249-5
Evaluation
Project Evaluation Instrument
Conclusion
So, you've tested your structure! What have you learned about structures? What makes things strong? What were some weaknesses of your structure?
You will spend 15 minutes in class writing your answers and comments to the reflective
follow-up questions on the form provided.
[Introduction]
[Task]
[Process]
[Resources]
[Evaluation]
[Conclusion]
[Teacher Notes]
[PowerPoint Presentation Download]
[PowerPoint Presentation on the Web]
This project was created by Nancy
Powell for Geometry Classes at Bloomington High School, Bloomington, IL. I
welcome your comments and questions.
|
