
Name__________________
This exploration will allow us to gather data to explore relationships of
chords, secant segments, tangent segments, and the angles and arcs that they
create.
WORDS TO THE WISE… refer to these before you ask me questions.
1. When you want to
measure something, it must exist. That
is, if you want to measure an arc, you must tell the computer to create that
arc.
2. Measure ARC
ANGLES (what we call arc measure), not arc lengths for this exploration.
3. To create an arc,
you must mark the circle first. Then
hold down shift and connect the endpoints of the arc in a counterclockwise
order.
4. To add an entry,
your “tabulate” table (redundant?) must be highlighted.
5. Put your name on anything you intend to print. (hint: use a textbox)
Exploration #1…
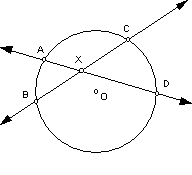 1. Construct and label the diagram to the left.
2. Measure all of the following.
-
 - mÐAXB - mÐAXC
-
 -
mÐCXD -
mÐBXD
-
mÐCXD -
mÐBXD
-
 - mAB
(arc) - mAC (arc)
- mAB
(arc) - mAC (arc)
-
 -
mCD (arc) - mBD (arc)
-
mCD (arc) - mBD (arc)
ORIENT
THE MEASUREMENTS ON YOUR PAGE
IN
ONE VERTICAL COLUMN.
3. Now select all of the measurements in order.
4. Go to the Measurement command on the command bar. Select tabulate. A list of
the measurements
and their values should appear in a table-like format.
5. Now change your picture by dragging any part of it.
6. Highlight the “tabulate” table by clicking on any entry. Go again to the
Measurement menu
and select add entry.
7. Repeat steps 5 and 6 at least 2 more times. (you should then have 4 measurements in your tables.)
Save
sketch as Explor1 on your disk. Print
your sketch. Close the sketch.
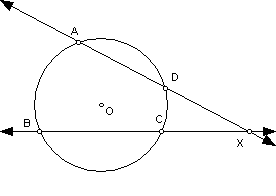 Exploration #2… Open a new sketch.
1. Construct a
diagram like this on
2. Measure all of
the following.
-
 -
-
 -
-
 -
-
 - mAB – mCD - ÐAXB
ORIENT THESE VERTICALLY ALSO.
3.Repeat directions 4-7 from above. Save sketch as Explor1 on your disk. Print your sketch. Close the sketch.
Save sketch as Explor2 on your
disk. Print your sketch. Close the sketch.
Exploration #3…
Open a new sketch.
1. Construct a diagram like the one to the
left.
2. Measure all of the following.
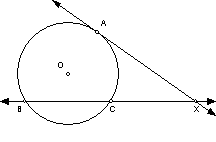 -
-
 -
-
 -
-
 - ÐAXB
– mAB – mAC
- ÐAXB
– mAB – mAC
ORIENT THESE
VERTICALLY ALSO.
3. Now repeat
directions 4-7 from exploration #1.
Save sketch as Explor3 on your
disk. Print your sketch. Close the sketch. |


