|
Science Notebooking: How to Get Started by
Natasha Cooke
I’ve honestly always been a huge fan of notebooks. But I always did it in my own haphazard way until recently. The format that I will outline for you below may seem obvious, but if someone doesn’t spell it out for you, as two great books did for me (Using Science Notebooks in Elementary Classrooms by Michael P. Klentschy - see www.nsta.org/store and Science Notebooks: Writing About Inquiry by Brian Campbell and Lori Fulton), notebooking can be an unorganized mess of notes.
The first page is essential. It sets the tone for the entire notebook. Without it, the organization of your thoughts and when they occurred can not be referenced properly. You don’t want your student’s notebook to be random. It’s best if the entire class/grade/school has a basic structure to follow that you as the teacher developed. Also, be sure to label each and every sheet with a page number (your choice to use the front and back of each individual page).
TABLE OF CONTENTS
Date |
Topic |
Page |
9.1.08 |
UNIT 1: Intro to Scientific Method |
4 |
9.3.08 |
Intro to Scientific Method…cont’d |
8 |
9.5.08 |
Dancing Raisins Activity |
11 |
9.9.08 |
Oobleck Activity |
14 |
9.10.08 |
Temperature vs. Time Experiment |
17 |
Pg. 1
In the pages that follow the table of contents, an activity, experiment, content, comprehension, or review lesson can be written as shown below:
Natasha Cooke, 4-308 9.1.08
Unit 1: Intro to the Scientific Method |
| Objective: Good Scientists develop a plan to conduct a experiment. |
| Problem- the question to be solved |
| Hypothesis- your educated guess |
| Materials- the objects needed |
| Methods/Procedure- a step by step plan |
| Observations/Data- a written record of what occurred during the experiment in a pictorial, graphical, or mathematical format |
| Results/Conclusion- the summary of your experiment based on your analysis of the data |
| Discussion- a brief overview of the successes, obstacles, and effects of the experiment or how to investigate further |
| ---We watched the movie, Louis Latamer |
| H.W.-Read p. 9 in Textbook and research a scientist or inventor |
Pg. 4
Teachers must also include rigor in their student’s work by encouraging labeled pictures, technical drawings, diagrams, models, graphs, charts, and tables. Below are a few sample student pages.
Natasha Cooke, 4-308 9.5.08
Dancing Raisins Activity
Problem: How raisins react when placed in seltzer water?
Observations/Data:
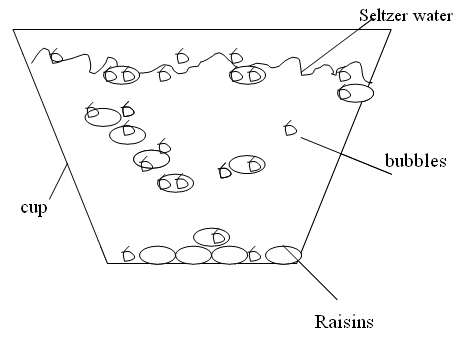
The bubbles from the seltzer are attaching to the raisins. 3 raisins are floating and touching the surface of the seltzer. Other raisins are just floating in the middle. The rest are stuck on the bottom. I drew a picture of all of them.
Conclusion: ________________________________________
__________________________________________________
Discussion: ________________________________________
__________________________________________________
Pg. 11
-OR-
Natasha Cooke, 4-308 9.9.08
Oobleck Activity Text: Dr. Seuss book,
Bartholomew and the Oobleck.
We used 2 parts cornstarch and 1 part water. The oobleck was goopy and fun. It felt like smooth wet sand. We put food coloring in to make it look pretty. I wonder if it’s a liquid or a solid. If I added more cornstarch, it would probably spread out and crumble. What would happen if I put it in the freezer?
Background Info: “Oobleck” is a polymer. It acts as a solid and a liquid, etc…
___________________________________________________________
___________________________________________________________
___________________________________________________________
Pg. 14
-OR-
Natasha Cooke, 4-308 9.10.08
H2O Temperature vs. Time
Problem: How does the temperature of frozen and liquid water change after ten minutes?
Hypothesis: I believe that ice will lose heat quicker than liquid water after ten minutes.
Materials: 2 cups, 2 thermometers, 3 cubes of ice, ½ cup of room temp. water, paper, pencil, clock with second hand
Procedure:
1) Place ice in cup and liquid water in another cup.
2) Write down starting temperature of both thermometers
3) Wait until second hand reaches the 12 mark and place a thermometer in each cup.
4) Record the temperature in each cup every minute for the next ten minutes.
Observations/Data:
| |
Frozen H2O |
Liquic H2O |
| Start |
|
|
| 1 min |
|
|
| 2 min |
|
|
| 3 min |
|
|
| 4 min |
|
|
| 5 min |
|
|
| 6 min |
|
|
Conclusion: _____________________________________________________
_______________________________________________________________
Discussion: ______________________________________________________
_______________________________________________________________
Pg. 17
Science notebooks offer elementary teachers the best means to express hands-on inquiry-based science. Notebooks are useful writing tools to engage students in relating their thoughts, feelings, observations, data tables, and methods. Children can use their notebooks before, during, or after an investigation. (Notebooks can get messy if materials are around and that’s okay!) Notebooks differ from journals or logs in that they are constantly being used. A journal usually is a space for children to write their reflections (i.e. “Today in science class, I…”) whereas a log records specifical data over time and does not offer a discussion of the investigation. But, however your students record their thinking, it proves that they are predicting, conversing, discussing, and synthesizing--all inquiry process skills that are not only embedded in the national science standards but also in your own teaching practices.
Do you want more ideas for science notebooking?
Questions or comments? E-mail me.
|


