Creating a Watermark
What
is a watermark?
The term
"watermark" is used to refer to faintly visibly text or graphics that
are embedded in sheets of paper when the paper is manufactured, printed on the
pages of a paper document, or embedded in the pages of an electronic version of
a document.
Embedded watermarks are often found in very high quality stationery and in
security papers (such as papers used to print checks or stock certificates).
NOTE:
Inserting a printed watermark will
place text or pictures in the background of a document, behind the regular
text, on every page. For example, students can place the word DRAFT on each
page of a rough draft, the school name on each page of a story, a map of New
England on each page of a report on the New England states... the
possibilities are endless.
Keep in mind that a printed watermark
will print on every page of a document, just as text in a header or footer
does. If students are placing a picture in the background, they should be
sure to put it where it won't interfere with the regular text. A nice effect
can be achieved by making the picture pale (that is, a "washout").
A washed-out picture doesn't interfere with the text, even if it is in the
middle of the page.
Objectives:
Students will be able to:
Time
Required:
1 day
Vocabulary:
document, background,
image, watermark, text, format, menu, diagonal, horizontal
Materials:
Microsoft Word
Procedures:
- Open
a new, blank document. Type your report, and format it.
OR
Open a document you've been working on and to which you would like to
add a background image.
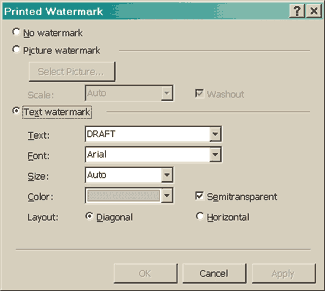
- When
you are ready to place text or a picture in the background of the
document, select Background from the Format menu, and then select
Printed Watermark.

- Select
either Picture watermark or Text watermark from the dialog box.
If you select Picture watermark, click Select Picture, and then choose
the picture you would like to use. Decide whether you want to scale the
picture or wash it out (make it pale).
If you select Text watermark, either select one of the options in the
Text drop-down list, or type your own text in the box. Set the font,
size, and color that you want for your text.
TIP: Light gray text works especially well.
Finally, select either Diagonal or Horizontal, and then click OK.
You will now see your watermarked picture or text on the background of
each page. Scroll down to take a peek. If you don't see the watermark,
select Print Layout on the View menu.
- If
you need to move the background text or picture, first choose Header and
Footer from the View menu, and then drag the text or picture elsewhere
on the page. When you're finished, click the Close button on the Header
and Footer toolbar.
Evaluation:
Extension
Activities:
Students will create a eye-catching
poster of their favorite book. The poster must be created in a word processor
and must have a watermark that depicts something about the book being
advertised.
Home Learning:
Students will write an acrostic
poem using the letters of their name. On the same document the student will
create a text watermark with their names.


