
Step
One
- Launch the PowerPoint
application.
Step
Two
– Select
Blank presentation. Click OK.
Step
Three
- From
the slide layout dialogue box, Select
Title Slide as your first slide. It has two text boxes one for your title
and one for a subtitle. Follow on-screen prompts to add title.
Click as directed to add subtitle and type your first name and last
initial. The color, size and
position of your text can be changed. See Step
Six.
Step
Four
- Add a new slide
by clicking on the New Slide icon on
the Standard Toolbar or select New Slide
from the Insert menu.
The slide layout dialogue
box appears with a large selection of slides.
Step
Five
- Select
the blank slide template.
To
choose a Background for slides:
Ø
From
the Format Menu select Background.
From this dialog box you can click the down arrow and explore the More
Colors and Fill Effects options
which are available.
Ø
Once
you have selected a background, you need to click Apply
in the Format/Backgrounds dialog box. Click
Apply To All for all slides to have
the same background.
To
add text to the slide:
Ø
You
can add a text box anywhere you like by choosing Text
Box under the Insert Menu.
Ø
Hold
your mouse approximately where you would like to add text, click and hold the
mouse button and drag the mouse to form a text box.
The text box can be moved and the size changed by following the
directions in Step Six.
Step
Six
- The color, size and position of your text can be changed. Select
any text on a slide by clicking and dragging over the text.
Using the handy Formatting
Palette you can change the font, color, size and
style of the text. Experiment with
each. Nothing is permanent until you
Save.
Positioning
the text:
To
position the text within a text box, choose Alignment
from the Format Window or use the
alignment tools on the formatting palette. To
change the position of the text box, select the text and an outline appears
around the text box; click on the line around the box
and drag to reposition the box.
Resizing
the text box:
Select
the text and an outline will appear around the text box.
Click on the line of the box
and "handles" will appear.
By clicking and dragging on the handles you can resize the box.
Step
Seven
- You can add pictures to your
slides:
Placing
images on your slides will add interest as they help your audience to understand
your topic. All your images should be directly connected to your topic.
Using
Original Pictures.
Ø
You
will first scan your illustrations. Launch your scanner software; then Preview
the picture that you have on the scanner; use the “marching ants” tool
to select the section of the photo you need; click to do a Final scan of the section of your picture you want to capture.
Choose Save As from the File menu.
Type in the name of your image with the extension .pict (eg.
photo.pict). In the location
box, find the location where you would like to save your picture, either to a
disk in Drive A or a predetermined folder on your hard drive.
Then click “Save”.
Ø
To
place your picture on your slide navigate back to PowerPoint and find the slide
you need. Go to "Insert" on
the menu, click and drag down to "Picture".
A dialogue box will appear. Now
find the picture you saved either on your disk or on your hard drive. Select
(highlight) the picture to be inserted, then hit "OK"
and the picture will appear on your slide.
Using
Pictures from PowerPoint ClipArt Gallery
Ø
View
the slide to which you want to add clip art.
Ø
Place
your cursor in the area of your slide where you would like to place the graphic.
Go to the Insert menu and
select Picture ; from the popup menu
choose ClipArt.
Ø
The
ClipArt Gallery dialogue box will
appear with thumbnails of many graphics. Select the category
of clip art; then hold the pointer down on the image you want and click on
the icon which is labeled “insert clip”.
Using Pictures
from the Web
Ø
Find
Pictures on the web to support your topic.
Ø
You
need to give credit for all resources used.
Getting
the address -
When you find the picture you need, select the address in the Location
Area on the top of the browser window by clicking and dragging the mouse
over it. The address will be something like http://forum.swarthmore.edu/~carol/
Once you have selected the address, you need to copy it by going to Edit
and select Copy. Navigate to the
PowerPoint application and go to a bibliography slide (you may need to create
this slide by following directions in Steps 4-6). Create a text box and go to
Edit and Paste. The address should now be on the slide.
Ø
To
get the picture
you
need, navigate back to the browser. Click
and hold the mouse down on the image until a menu appears; select copy
this image; navigate back to PowerPoint.
Find the slide you need and go
to Edit and Paste.
Editing
Pictures
To
change the picture size:
Ø
With
the picture selected (click on the picture to select it – you will see small
squares called “handles” around the perimeter), place the cursor on a corner
handle of the picture.
Ø
The
cursor turns into a diagonal arrow on each end. Click and hold the mouse and
drag the picture in to make it smaller or out to enlarge it.
Caution!
If you use one of the side handles, the picture will become distorted.
To
crop a picture:
Ø
From
the View menu, select Toolbars
and drag to Picture to activate this
toolbar. From this toolbar click on
the cropping tool.
Ø
Be
sure the picture is still selected. Position
the pointer over any handle and drag to crop the picture.
A
picture can be moved anywhere on a slide.
Ø
Move
the mouse over the picture until the pointer becomes a cross with arrows going
in all four directions.
Ø
Click,
hold, and drag the picture to the desired location on the slide.
Step
Eight
- Repeat Steps Five through Seven for each new slide. Save
your work often!
Ø
On
the bottom left, choose the fourth icon which is called the slide
sorter. You can also get to the
slide sorter from the View menu.
The left side of the screen will be covered with miniatures of each
slide.
Ø
Add
a transition to a slide by selecting the slide (click on it).
When the slide is selected, you can animate the slide by clicking on the
drop-down arrow where it says No Effect
(a long rectangle at the top left of your screen).
Scroll down the list and select an effect from the list by clicking on
it. Do this for each slide!
Step
Ten
– Add builds to your finished presentation.
To
“build” means to apply the various elements such as text, pictures, etc. to
the slide one at a time. The best
place to control the builds on a slide is the Custom
Animation dialog box. You can
access this box from the Slide Show Menu.
Ø
From
the Order and Timing tab, the slide
items are shown in the window on the top left of the dialog box.
Ø
Click
one of the items and then click on the Effects tab.
Ø
Click
the down arrow under Entry Animation and
Sound and choose an effect. From
this window you can also select how you want the text introduced.
Ø
You
can set the order in which the items appear by using the arrows in the Order
and Timing window.
Step
Eleven
– Add music to enhance your
presentation. Caution!
Music with words would be distracting to the presentation. The music
should be instrumental only.
Using
music from within PowerPoint:
Ø
To
insert the music, click Insert; then
select Movies and Sounds.
Ø
Click
Sound From Gallery.
Select the sound and close the window.
Ø
A
speaker icon will appear on the slide. If you want to have the sound play
automatically, click YES. Then move
the speaker icon off the slide and onto the pasteboard (gray area around the
slide) where it will be invisible to your audience. If you do not want the sound
to be automatic, but want to activate it yourself, then position the speaker
icon in the desired location on the slide.
Having
music play through a number of slides:
Ø
Right
click on the speaker icon. Then
click on Custom Animation from the
drop down box. When the dialog box
opens, there are several steps to complete.
Ø
Under
the Order and Timing tab, select the
media file and using the arrow move the sound (media) up so that it plays as the
presentation begins.
Ø
Under
the Effects tab, click the down arrow
and select Appear.
Ø
Under
the Multimedia Settings tab, click Continue
Slide Show.
Ø
Under
the Multimedia Settings tab, click the
After button and place the number of
slides in your presentation in the space to the right.
Ø
Under
the Multimedia Settings tab, click More
Options and then click Loop Until
Stopped. Click on OK.
Note:
If you would like the same music selection playing from the beginning
through the end of the presentation, you will need to do the above steps on
slide 1.
 Step
Twelve
– Add hyperlinks to link each slide in the show to the title slide. The
presentation can then be viewed either as a linear or sequential slide show or
as a nonlinear, branching slideshow.
Step
Twelve
– Add hyperlinks to link each slide in the show to the title slide. The
presentation can then be viewed either as a linear or sequential slide show or
as a nonlinear, branching slideshow.
Adding
hyperlinks in PowerPoint:
Ø
Type
the title of each of the other slides on the title slide.
Ø
Highlight
one of the titles.
Ø
Click
on the Slide Show Menu and click Action
Settings.
Ø
Click
the Hyperlink to: button.
Ø
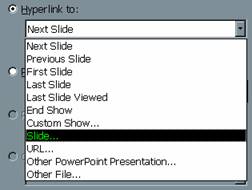
Click
the triangle beside, “Next Slide:” and choose Slide…
Ø
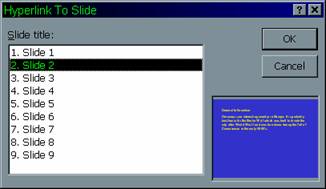
Choose the slide
that matches the highlighted word. Refer to your storyboard to help you keep up
with which category is on each slide.
Ø
Click
OK.
Ø
Click
OK again to apply the hyperlink.
Ø
 Repeat
these steps to create a hyperlink on each of the categories in your slide show.
Repeat
these steps to create a hyperlink on each of the categories in your slide show.
Step
Thirteen
– Add a hyperlink on each of the slides in the show starting with Slide 2 that
will take the viewer back to the title slide.
Adding
a hyperlink back to the Home or Title Slide:
Ø
Navigate
to Slide 2.
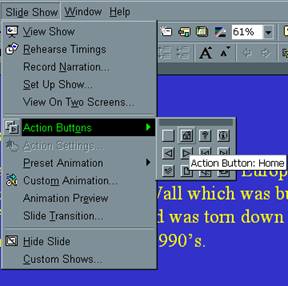
Ø
Click
on the Slide
Show Menu and click Action Buttons.
Ø
Slide
your mouse to the right and choose the second button, the one that looks like a
house.
Ø
Move
the plus sign to the place on the screen where you want your button to be.
Click/hold and draw diagonally. A small house will appear on your screen.
Ø
Click
Ok.
Ø
Resize
or move the button to a new location if needed.
Ø
Navigate
to the next slide in the presentation.
Ø
Repeat
the steps to add a “Home” button to each of your slides.
Bullets
and Numbering
Create
a text box or select the existing text box where you want to place bullets or
numbers. Go to the Format menu.
Choose Bullets
and Numbering. A window
opens giving options from which to choose. You
may choose Style, Color, and Size of
the bullet. Under Style you can
select a picture or special characters as
a bullet. Experiment with each. Nothing is permanent until you save.
Transferring
Your Presentation to a VCR Tape
Once
the slides are completed, the presentation is ready to transfer to a VCR tape.
Hook
the Smart TV/VCR to the computer or hook up the computer to a TV/VCR using an
AverKey. Begin the presentation with
the first slide visible before you start to record onto the VCR tape.
The
following suggestions will make your VCR presentation first-class:
Tip
1
-
Have the students make a nice label for the edge of the tape.
They can use Word Art or a nice font in Word.
The label can then be affixed to the tape.
Tip
2
-
Do not begin recording the tape until the slide show has been started.
You might even want the students to have a blank slide at the beginning
of their presentation (for timing purposes) if you intend to record it to tape.
Tip
3
- End the presentation with a blank slide and stop the VCR tape on this slide.
Tip
4
- When they are recording the presentation-make sure the mouse is not visible on
the screen. Allow enough time to read the text before clicking the mouse and
proceeding. Your audience will want
time to reflect as they view it.