 Lesson
Plan #1
Lesson
Plan #1 Lesson
Plan #1
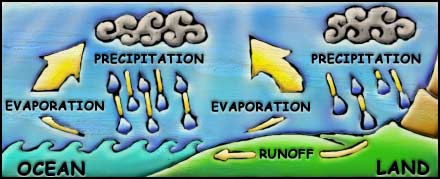
The Water Cycle
Duration: 2 days
Objectives: The
student will describe that water, which covers the majority of the earth's
surface, circulates through the crust, oceans, and atmosphere in what is known
as the "water cycle."
Water evaporates from the earth's surface,
rises and cools as it moves to higher elevations, condenses as rain or snow, and
falls to the surface where it collects in lakes, oceans, soil, and in rocks
underground.
Materials:
wet sponge or towel, chalkboard, heat-resistant dish with lid, access to a freezer, hot plate, student worksheet, Kid Pix Deluxe Software or any productivity software such as Microsoft's PowerPoint, HyperStudio etc.
Key Vocabulary:
water cycle, hydrologic, evaporation, condensation, precipitation, water vapor
Procedures:
Before the activity, print The Water Cycle Student Worksheet so that students can record their answers.
1. Using the wet sponge or towel, have students draw a large O for ocean on the chalkboard. Allow them to watch it at it disappears. Ask: Where do you think it went?
2. Again, using the wet sponge or towel, have the students draw a large O again. This time ask them to try to make the O disappear faster. Have them try their own ideas and/or suggest fanning the O to represent wind or using a lamp to imitate the sun.
3. Allow the students to record their observations on the student worksheet.
The above three steps explain EVAPORATION- how water gets into the air to form clouds.
Next,
1. Have students put the heat resistant lid in the freezer for at least 30 minutes before this part of the lesson.
2. Place the heat-resistant plate on the hot plate so that it gets hot.
3. When the dish gets warm, turn the heat off.
4. Take the lid out of the freezer and place it on the dish. Allow the students to observe what happens.
5. Have the students record their observations on the worksheet.
Have the students go to the following website:
At this site the students will follow a drip to see how it travels from the ocean to a cloud and back to the ocean again. Instruct the students to click on all the links available for more information.
Here are some more useful links:
Graphic of Water Cycle great pictures of the water cycle
The Water Cycle learn about the water cycle and sunshine, evaporations, rain, mountains, streams and oceans
Second Graders View of the Water Cycle view an interpretation of the water cycle by second grade students
Assessment:
Have the students plan and create their own animated versions of the water cycle.
Slide 1 Title
Slide 2 First step of the water cycle.
Evaporation- students should show direction of the water's evaporation, using
arrows. Should clearly illustrate the path of water.
Slide 3 Second step of the water cycle.
Condensation- students should show the moist air clouds rising and forming
clouds.
Slide 4 Third step of the water cycle.
Precipitation-
students should show the water returning to the land in forms of rain, snow,
sleet, or hail.
Slide 5 Fourth step of the water cycle.
Collection- students should show how the water seeps into the ground and runs
off into rivers, lakes, and oceans.
Using the multimedia software, have students put the slides together into a slide show.
Student Water Cycle Performance Assessment Sheet
Home Learning:
Have students create ocean journals on a floppy disk. The students will write a story about the journey of a water drop as it goes through the water cycle.
Extension Activity:
Visit Brainpop.com, The Water Cycle Students will view a movie about the water cycle and take a quiz.
Students can present to the class interesting facts they learned while viewing the movie.