For our tutorial we will guide you to the basic principles of HyperStudio creating a mini-stack. You will do your project stack on your own.

5. In the next dialog box, select the number of colors and size for the new stack.
A new stack will be created with one blank card, which will appear on your screen.
Now, let us create two more cards for our mini-stack.
6. From the Edit menu choose New Card. You now have your second card.
7. Repeat step 6 for the third card.
We are ready to go...but first let's save our little stack.
8. Put your disk into the disk drive.
9. From the File menu choose Save Stack As. Save as you would normally. Name our stack "Little Stack".
Now, let's create backgrounds for our little stack.
We need to get Card #1 of our stack...
1. From the Move menu, choose First Card.
2. Pull down the Options menu and select Set Eraser Color.
3. Choose a color and then choose Erase Screen. Your first card will be the color you selected.
Card #2
1. From the Move menu, choose Next Card.
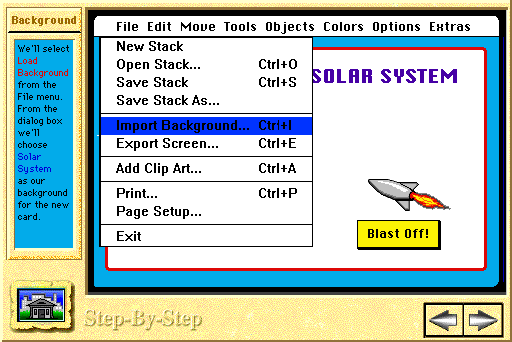
2. From the File menu, select Import Background (Ctrl+I ).

2. You can select from the clip art available for your background or you can use any images that you might have (note sites on copyright laws below). You can also use a video clip from an attached video camera or an image from a digital camera or a scanned photo. A standard open-file dialog box will list the file names of HyperStudio clip art. You can choose Disk file if you want to use an image that you have on disk.
3. For our little stack select from the HyperStudio clip art. The entire picture will be pasted onto your card.
Card #3
1. From the Move menu, choose Next Card.
2. From the Options menu choose Line Size.
3. Click the thickest line and then choose OK.
4. From the Colors Palette choose a color for your border.
5. From the Tools menu choose the Rectangle Drawing Tool.
6. Move the pointer to the upper left corner of the card...the position of the left corner of your border. Click and hold the mouse button and drag the pointer to the lower right corner of the card...the position of the bottom right corner of your border. Release the mouse button, and the border will appear on your card.
*Note: When creating a large project, each time you create a new card type a topic heading on that card and continue with your work. It provides a little organization similar to the index cards you are using to outline your future stack.
2. Now use the Copy Card option in the Edit menu. Do this twice. You should now have a total of seven cards.
*Note that copying cards will copy everything that is on the card: background, text, graphics, and buttons. This can be useful if you want consistent buttons to appear on every screen.
3. The Storyboard option of the Edit menu lets you see all your cards of your stack. You can use the storyboard as a quick way to view or move among your cards, rearrange, or delete them.
*Storyboard is not available on all versions...I don't believe it's available in the Windows version.
Save your mini stack! Now let's add graphics...
Adding Clip Art Graphics
1. From the Move menu choose First Card.
2. Pull down the File menu and choose Add Clip Art.
3. A dialog box will appear listing the graphics available. Scroll down and choose Education.
4. You have to choose the graphic you want by using the rectangular "marching ants" selector or the lasso. Select either one.
5. If you chose the rectangular selector position the cursor to the upper left corner and holding the mouse down drag to the bottom right of the graphic. Click on OK.
6. If you chose the lasso draw completely around the graphic then click on OK.
7. The graphic will be on your card and it will be shimmering. While it is shimmering, click on the center of the graphic and drag it to the location you want. Once the graphic is in place, click outside of the graphic.
Adding Your Own Art
Note: If you draw a graphic on a card it becomes part of the background.
1. From the Move menu, choose Next Card (This should be card 2).
2. Make sure your Tools menu is available (see Basics). Choose the Paint brush tool.
3. From the Option menu choose Brush Shape. Choose the one you want.
4. Paint...create....Paint....choose another tool...another color....create....Now wasn't that fun!
Adding a Graphic Object
1. From the Move menu choose Next Card (This should be card 3).
2. From the Objects menu choose Add a Graphic Item.
3. A dialog box will appear listing the graphic files available.
4. Scroll down and choose Education.
5. Choose a graphic like you did previously (with the lasso or rectangular selector... *Note: if you want to resize your graphic later choose the rectangular selector), then click OK.
6. A graphics appearance window will appear. Choose a frame color and press the up arrow to increase the frame width. You will now have a frame around your graphic.
7. Place the graphic like in the previous example and click outside of the graphic to fix it in place. The graphic is on a separate layer. Pull down the Tools menu and select the pointer tool. Now move it to the graphic you placed on the card. Click and drag the graphic. Because it is a separate layer, it can be moved freely any time.
Stay on Card 3 start section on Adding Text.
Did you know...if you are surfing the net and see a graphic you want to use (ask permission) click and hold down the mouse button and Save Image As and save it on a disk or on your hard drive. For PC users click on the right mouse button Save Image As and put it in whatever folder or save to a disk, etc.
To add digital pictures, scanned images or pictures from the web...save them in a folder or on a disk. Follow the steps to Adding a Graphic Object and...in the dialog box, find the file you saved your image in. Select the image and place it on the card.
You can also copy and paste an image to your HyperStudio card. Placing an image in this way makes it a "painted" image.
OK... Now you should have 5 cards in your stack.
The first card should have a solid color background with an education graphic
on it.
The second card should have a clip art background with your own art work
added to it.
The third card has a border for a background and a graphic object from the
education clip art is placed on it.
The fourth and fifth cards have just the border backgrounds.
How are you doing? Good?
We are going to use Cards 4 and 5.
Card 4 - Text Tool
Please Note: Painted text can be difficult to edit once it's been added to the background because you cannot edit it as text. To change the text you will have to cut or erase the painted text and re-type it. Beware when you delete painted text, you also delete whatever else is enclosed in the selection, such as the background and any images that the text overlaps. Before cutting or erasing, make sure you have set the eraser tool to match the background.
1. From the Move menu choose Next Card (This should be Card #4).
2. From the Options menu choose Text Style. Choose the font, style, color and size of the text you want. Then click OK.
3. From the Tools menu choose the Text Tool (T). A cursor will appear click the mouse button where you want to begin typing the text.
4. Type HyperStudio is Great on the screen.
5. Move the cursor to another area and type I love it!
Card 5
1. Choose Next Card from the Move menu.
2. Choose your Text Style as in #2 above.
3. From the Objects menu choose Add A Text Item. A flashing rectangle will appear on the card.
4. Click the mouse on the center of the box and drag the box to the left corner. Then point the mouse on the lower right corner and resize the box dragging it down and to the right.
5. Click outside the box. A Text Info window will open. Let's talk about some of these options...
7. A text box will appear with a cursor in the upper-left corner.
8. Type the Introduction section of this tutorial in the box. Notice the text wraps as you type.
Save your mini-stack.
Editing a text object
To edit the text of a text object, select the Text
tool (T) from the tools, then click in the text object. The cursor will turn
into the text insertion point, and you can edit the text. Click outside the text
object when you are finished editing. To change the appearance of a text object
select the Edit Text tool from the upper portion of the tools palette (see Basics).
Double-click on the text object. The Text Appearance dialog box will appear.
Click once on the text object this will give you the cursor cross hairs so you
can move the text object.
1. From the Move menu choose First Card.
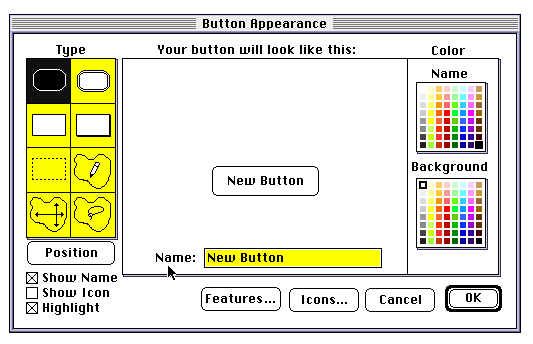
2. From the Objects menu choose Add a Button. The Button Appearance screen will open as seen below.

Note: you can also choose an icon such as arrows, pointing hands, and fingers from the HyperStudio clip art by clicking on the Icons button.
4. Type a name for your button in the box beside the word Name.
5. Choose a color for the text (Name).
6. Choose a color for the button background. Click OK.
7. The button will appear on the card...drag it to where you want it. Click outside of the button.
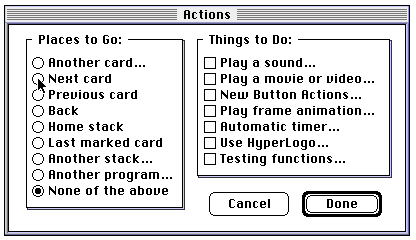
8. A Button Action screen like this will appear.

Another Card: Links to another card in the same stack or in another stack.
Next Card: Links to the card after the current card.
Previous Card: Links to the card just before the current card.
None of the Above: Stay on this card while doing one of the actions.
Things to Do:
Play a Sound: Record your voice or select a sound.
Play a Movie or Video: Show a QuickTime movie or a video clip.
New Button Action: Select from a variety of options such as Roll Credits
(see below), Hide Show, Animator, Web Links, etc.
Play Frame Animation: This creates a flip-book style of animation.
Automatic timer: The button will activate at a specified period of time.
Use HyperLogo: Special programming language for scripting.
Testing Functions: Keeps track of correct and incorrect answers (this is
great for teachers).
The Button Action screen lists the Places to Go
and Things to Do with the button. It
determines the action of the button.
9. Click on Another card... Notice it has an ellipse (...) indicating a dialog box will follow. (Another card is a good option when you want to link while you create...it lets you choose a new card to link to whereas the other options wants you to specify the card you want to go to). The screen that follows lets you pick which card you want to link Card 1 with.
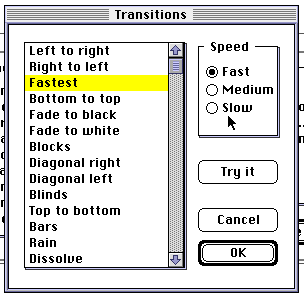
10. Choose Card #2. A Transitions screen appears.

11. Choose an option then click OK.
12. Look on the Action screen above...To the right are Things to Do. Here you can add sound, animation, video, and other actions for your card. If you wish to add a sound do it now. Click on Done.
13. Test your button by selecting the finger tool and clicking on the button.
14. Create buttons that link the remaining cards in your mini-stack.
Note: To edit your button go to the Tools menu and select the pointer. Double-click on the button and the Button Appearance window will open.
Buttons can be images or text. To have text or a graphic act as a button, select one of the "invisible" button tools in the Button Appearance window. These are the bottom four tools. You can then use the tool to draw an outline of the button; the outline will not appear on the final button.
Save your work!
Isn't this GREAT? A couple more things and you will be a HyperStudio
Pro...
1. From the Objects menu choose Add a Button.
2. Choose a button type from the top four.
3. In the box Name: Type Scroll Text.
4. Drag the button to a location right under your scrollable text box.
5. Click outside of the button and the Button Action screen will open.
6. Under Places to Go: choose None of the above. Under Things to Do: choose New Button Actions...
7. Click once on Roll Credits and in Use this NBA.
8. A Roll Credits dialog box will open. Choose the text box and the speed. The higher the number the faster the credits will roll. (Click on Test Speed to preview).
*Note for smoother scrolling set the credits to scroll by pixels instead of scrolling by lines.
9. Click OK. Click OK on the Button Actions screen.
Note: The NBA called Hide and Show is similar to creating Roll Credits. It can be used to make an object appear and disappear.
Save your work.
Now let's animate one of your graphics...
1. Move to Card #3.
2. Create a button (refer to the buttons section).
3. Select New Button Action from the Things to Do menu.
4. Click on Animator and Use this NBA.
5. A screen will appear that says "How do you want to select your graphic?" Choose From the Screen and choose the lasso tool.
6. Hold the mouse button down and drag the graphic to create the animated path.
7. Press the space bar to end the animation path. An animator screen will appear.
8. Select options and Playback to preview. Click on OK/Done for remaining dialog boxes.
1. Move to Card #2 (remember this card should have your original artwork and a button linking it to the next page)
2. Create a button.
3. Select New Button Action from the Things to Do menu. From the New Button Action dialog box, click once on NetPage and on Use this NBA.
4. A box will open that asks for the Uniform
Resource Locator... type in the box:
http://yahoo.com/arts/
(This will give you sites that will show what REAL art is
supposed to look like!
5. Click on OK and then Done.
Remember bells and whistles are great but should be used when
appropriate...too many can detract from the main message of your stack.
Use them wisely.